BUILDING A BETTER TWIN
Engine
STAGE I ENGINE
EXHAUST: Although the 650’s exhaust system proved to make
excellent power at higher rpm (more about that later), it also killed power in
the 3,000 to 4,000-rpm range. Even before we took the bike to Jerry Branch’s
dyno, it was obvious that the 650’s low-end torque and response could be
improved, so we tried some aftermarket exhaust systems. We tried all the
variations we could find: two-into-ones, replacement mufflers, and one set of
replacement header pipes. They were all unsatisfactory in one way or another.
The two-into-ones reduced ground clearance on the right so much that the bike
was not fun to ride. Besides, they really didn’t improve the power enough to
overcome the ground-clearance objection. Replacement mufflers had no chance to
succeed; for, as we sawed the factory mufflers from the stock header pipes, we
found the source of the stock exhaust’s anemic behavior: the inside diameter
of the stock pipe is just 1.125 inches. Racing versions of the XS are regularly
fitted with pipes that are a full 1.75 inches in diameter. The replacement
headers were excellent: they were a desirable 1.5 inches in diameter and 33
inches long—almost perfect. The problems were that we could not find a
satisfactory muffle to go with them and their exhaust flanges broke because they
were too fragile. Through quirky circumstances we found a manufacturer who was
willing to make exhaust pipes to fit our specifications: Bub Enterprises in San
Jose, CA. We got our exhaust pipe specs from available literature regarding such
things and from Jerry Branch, who is the most successful horsepower-getter in
the motorcycle industry. Jerry agreed with our
1.5-inch-diameter-by-32-inch-length design, saying that it would probably give
the XS650 the kind of performance we were looking for: excellent mid-range
torque and the broadest possible powerband. The design later proved to be a
complete success.
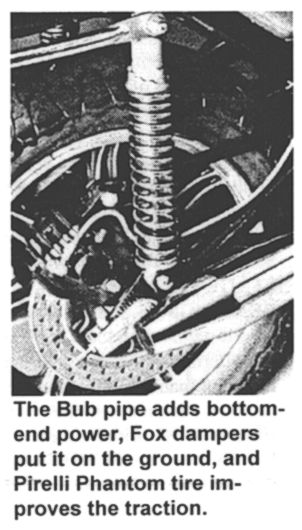 Bub Enterprises quickly made up a prototype pipe
and rushed it through the chrome shop so that we could take the photos you see
in this article. While he had the bike, he also made up a set of two-into-ones
that were of the same diameter and length and would not drag. This is the pipe
that is on the bike in the lead photo. Bub felt that many XS owners would prefer
the slightly less expensive pipe even if the two-into-two proved to give better
performance. Both Bub pipes were designed to give the greatest possible ground
clearance and will clear the right engine case enough to allow the installation
of the Lockhart oil cooler fittings, something the late stock pipes will not
allow. The Bub two-into-two is fitted with Bub’s Norton-Commando replica,
straight-through muffler. It is made of .065-inch-thick tubing and is well
chromed. Although a little loud, the louvered construction of its silences tube
gives the exhaust a very pleasant sound that fairly shouts,
"motorcycle!" The two-into-two pipe costs about $165, in chrome only,
from your dealer and the two-into-one retails for $145 in chrome and $135 in
black.
Bub Enterprises quickly made up a prototype pipe
and rushed it through the chrome shop so that we could take the photos you see
in this article. While he had the bike, he also made up a set of two-into-ones
that were of the same diameter and length and would not drag. This is the pipe
that is on the bike in the lead photo. Bub felt that many XS owners would prefer
the slightly less expensive pipe even if the two-into-two proved to give better
performance. Both Bub pipes were designed to give the greatest possible ground
clearance and will clear the right engine case enough to allow the installation
of the Lockhart oil cooler fittings, something the late stock pipes will not
allow. The Bub two-into-two is fitted with Bub’s Norton-Commando replica,
straight-through muffler. It is made of .065-inch-thick tubing and is well
chromed. Although a little loud, the louvered construction of its silences tube
gives the exhaust a very pleasant sound that fairly shouts,
"motorcycle!" The two-into-two pipe costs about $165, in chrome only,
from your dealer and the two-into-one retails for $145 in chrome and $135 in
black.
IGNITION: Most of the battery problems that
XS650 owners suffer with are directly due to the poor performance of the stock
ignition coils. The voltage drop that occurs when the starter motor is used is
often enough to prevent the ignition coils from making enough voltage to cause a
spark in the combustion chamber. This leads the rider to run the battery down
trying to start his bike, and many XSs run around with poorly charged batteries.
One of the symptoms of this problem is that it may kickstart easily but is
reluctant to go when prodded by the electric foot. Andrews Products makes a
replacement coil for the Yamaha RD400 that fits in the rather cramped space
under the tank of the 650. This coil has a three-ohm-resistance primary winding
and really puts out the pressure, even when you use the electric starter on a
cold morning. After we installed a set of these coils, we never had another
problem with cold starting nor any other sign of a low battery-charge condition.
We bought ours from Racer’s Supply although you should be able to get them
through your local motorcycle dealer. They retail for $20 each and are worth the
tariff. Your bike will start better and respond more willingly, and the extended
life of a fully charged battery will be worth more than the cost of these coils.
We have many thousands of miles on the Martek 1000Y ignition, and it has
performed flawlessly. However, when we installed the low-resistance Andrews
coils, we had to replace the Martek with one of the later,
higher-current-capacity, Martek 1000Ys or one of Dyna III’s D-36-1 units.
Either of these ignitions will take the higher current flow of the Andrews
coils. The Dyna III has the added advantage of allowing you to adjust the timing
of each cylinder separately. You can determine the suitability of a Martek
ignition for use with the Andrews coils by looking for a connector in the wiring
harness leading from the black box to the sensor plate. If there is no
connector, the ignition should not be used with Andrew coils (unless you install
an automobile ignition ballast resistor in series with each of the power leads
to the coils). Electronic ignitions will, of course, eliminate points care and
reduce ignition maintenance to an occasional plug change and a dab of lube to
the advance mechanism every once in a while.
Be sure to check your Yamaha’s advancer for
correct timing at full advance. Some of these units have been known to
over-advance the ignition. If yours does, have your dealer
carefully bend the advancer’s flyweight stops until the fully advanced timing
and retarded (idle) timing are correct.
CARBURETION: On pre-1980 XS650s, the Mikuni
carbs can be tuned by moving the needle position or by replacing jets.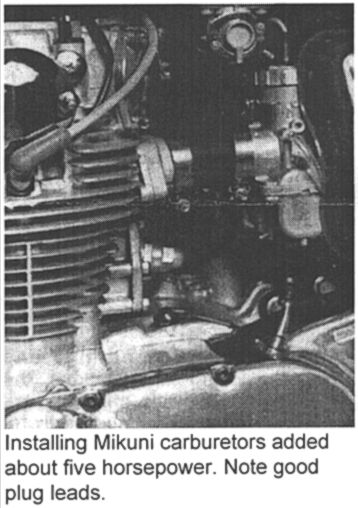 Post-1979
bikes are fitted with the Hitachi units with all the jets
pressed into place; there is little you can do with these units but replace
them. But if you really want power on the top end of the rpm spectrum, replacing
the carbs is a good idea, no matter which carbs your bike came with. Bub pipes
require jetting changes to the stock Mikuni carbs. We found that K&N R-135/2
air filters (they replace the airbox) are quieter and cheaper than the OEM-type
K&N replacement filters. After fitting the Bub pipes and K&N filters,
the main jets should be replaced with No. 145 jets, the needle should be dropped
to its lowest position (remember, lower the needle not the clip), and the
plastic caps removed from the idle mixture screws. Adjust the mixture screws for
fastest idle, keeping the idle speed down to less than 1200 with the idle-speed
screw. The idle-mixture screws should be set so that turning them a quarter-turn
in either direction will cause the idle speed to fall slightly. If you own a
1980 or ’81 XS, or if you want a substantial power gain above 6,000 rpm,
fitting accessory carbs becomes necessary. Jerry Branch developed a 36mm Mikuni
carb set for the XS that will give you more immediate response and more power.
The kit is complete with carbs, cables, and manifolds and is available with
jetting for either Stage I or Stage II engine. We fitted these carbs to both
versions. They work. The kit is available from Branch Inc.
for $169.50. If you would like the additional advantage of accelerator pumps and
really beautiful carburetors, you might consider fitting Dell’Orto 36mm pumper
carbs to your 650 as one staffer did to his personal bike. The Dell’Ortos cost
more than the Mikunis, but they work wonderfully and are very responsive with
their adjustable accelerator pumps. Engine Dynamics Company will supply you with
filters, adapters, cables, and fuel lines for $268.30. Be sure to specify
whether you are running the Stage I or Stage II engine.
Post-1979
bikes are fitted with the Hitachi units with all the jets
pressed into place; there is little you can do with these units but replace
them. But if you really want power on the top end of the rpm spectrum, replacing
the carbs is a good idea, no matter which carbs your bike came with. Bub pipes
require jetting changes to the stock Mikuni carbs. We found that K&N R-135/2
air filters (they replace the airbox) are quieter and cheaper than the OEM-type
K&N replacement filters. After fitting the Bub pipes and K&N filters,
the main jets should be replaced with No. 145 jets, the needle should be dropped
to its lowest position (remember, lower the needle not the clip), and the
plastic caps removed from the idle mixture screws. Adjust the mixture screws for
fastest idle, keeping the idle speed down to less than 1200 with the idle-speed
screw. The idle-mixture screws should be set so that turning them a quarter-turn
in either direction will cause the idle speed to fall slightly. If you own a
1980 or ’81 XS, or if you want a substantial power gain above 6,000 rpm,
fitting accessory carbs becomes necessary. Jerry Branch developed a 36mm Mikuni
carb set for the XS that will give you more immediate response and more power.
The kit is complete with carbs, cables, and manifolds and is available with
jetting for either Stage I or Stage II engine. We fitted these carbs to both
versions. They work. The kit is available from Branch Inc.
for $169.50. If you would like the additional advantage of accelerator pumps and
really beautiful carburetors, you might consider fitting Dell’Orto 36mm pumper
carbs to your 650 as one staffer did to his personal bike. The Dell’Ortos cost
more than the Mikunis, but they work wonderfully and are very responsive with
their adjustable accelerator pumps. Engine Dynamics Company will supply you with
filters, adapters, cables, and fuel lines for $268.30. Be sure to specify
whether you are running the Stage I or Stage II engine.
CLUTCH: The XS650 has a richly deserved reputation for poor
shifting. What is not generally known is that this common shifting difficulty is
due to clutch drag. We have not been able to totally eliminate clutch drag in
our project bike but we have found ways of minimizing it. Late in 1979, Yamaha
introduced a new clutch-hub design in many of their bikes. This hub incorporates
a Belville washer to widen the engagement zone of the clutch and to eliminate
the shuddering that occasionally crops up among XS650s. Unfortunately, it also
decreases the separation of the plates, which promotes clutch drag. We found
that changing to the earlier hub helped the problem. The greatest decrease in
drag was obtained by fitting one of the high-performance clutches supplied by RC
Engineering. These plates have proven to be the most durable available for
dragracing. For our use, though, they are superior for other reasons. The RC
clutch has the smoothest engagement of any clutch we tried (and we tried every
clutch we could find). It also had substantially less drag than any other. Even
with the power we later got with the Stage II engine, the stock clutch is good
enough, but if you want the best shifting, fit the RC clutch for $61. It
includes friction discs, copper-coated steel plates, and somewhat heavier
springs. Installing the good clutch hub and exotic plates will do little if you
don’t follow up on the other cause of bad shifting and clutch drag:
lubrication and adjustment. There are two adjusters on the clutch cable. One is
at the lever end and the other is at the bottom of the cable, where it runs into
the left engine case. Screw both of these adjusters in as far as they will go.
There will be excessive play in the lever as a result of this. Use the clutch
pushrod adjuster in the side case to set clutch free plan. By following this
procedure, you will have put the clutch pushrod actuator in the best position to
assure maximum clutch plate separation when you pull in the lever. After all
this, there is one more thing to attend to: lubrication. We recommend the cable
lubricator sold by Yamaha. It clamps over the end of the cable and allows use of
one of the aerosol cans. PJ1 chain lube works very well as a cable lube, so does
Molly Blue, if you can find some. Lube the clutch cable every time you change
oil, and you will assure yourself of the best possible clutch action.
STAGE II: ENGINE
Our stage II engine is the result of much research and effort on
the part of both Motorcyclist and several talented and interested people in the
industry. Upon committing ourselves to developing the 750cc version of the
Yamaha, we had no idea what we were undertaking; surprisingly little development
had been done on street versions of the successful dirt track version of the
650. All the 750cc kits we investigated were developed during the early ‘70s
when gasoline was of better quality than is available today. Consequently they
had high compression-ratios that demand better gasoline than we now get. Most
kits develop a compression ratio of about 10.5:1-too much to be reliable unless
treated kindly and kept in excellent tune. We found several XS owners who had
installed 750 kits and experienced severe problems due to detonation. There were
other problems: cylinder sleeves (they have to be replaced to make a 750) that
were too thin to remain round and straight during hard running, soft sleeves
that wore rapidly, poor rings, and unreliable pistons. Many owners have made
650/750 conversions and have had no trouble whatsoever. However, we insisted
upon retaining the stock engine’s reliability. We wanted a kit that would give
satisfactory performance even if it was installed with less than professional
care. After a lot of work and critical advice from some very experienced engine
builders, we succeeded. One of the benefits of our work was the development of a
street 750 conversion that will work with today’s gasoline and that reflects
the latest thinking in combustion-chamber design. After consulting with Jerry
Branch, the foremost filter-person for what works, we knew what we had to have
to achieve the engine performance and reliability we had in mind.. Instead of
trying to build an engine that would give the best quarter-mile times and
speeds, we wanted a broad powerband with lots of real-world, useful power-which
is what we got.
CAMSHAFTS: The cam had to be a torquer with generous lift and
short duration. Most of the cams readily available at the time were biased toward
the top of the rpm range and had been developed for dirt trackers that had to
compete against the dominant Harley XRs. We found two cams that seemed to fit
our requirements: one from Shell Thuet and the other from Megacycle. The Shell
cam is his No. 1 cam and is a regrind. It has a lobe center of 100 degrees and
the timing of the intake and exhaust are symmetrical about top dead center (the
intake opens as many degrees before TDC as the exhaust closes after). Megacycle
recommends this cam for TT racers, since it gives a very broad power band - as
we found out. The Megacycle cam is a welded-up and reground cam with lobe
centers of 104 degrees. The Megacycle cam has .030 inch more lift than the Shell
Racing cam (.440 Vs .410 inch). It promised more peak power with some small loss
of bottom end power when compared to the Shell cam. We were never able to find
out. We simply ran out of time before we had a chance to try the Megacycle cam.
The Shell cam is cheaper because it takes less time to regrind a stock cam than
it does to weld on the hardface material and ten grind the cam as is done on the
Megacycle cam. The exchange price of the Shell Racing No. 1 cam is $78; there is
a core charge of $90, so you should furnish your old cam when ordering. The
Megacycle cam sells for $139 exchange with the same $90 core charge. Neither of
these cams requires any modifications to the valve gear; stock valve guides will
work and there is no problem with valve-spring coil-bind. For best results, they
must be times so that the intake opening and exhaust closing are symmetrical
about top dead center. Follow the general procedures outlined in the October
1980 issue of Motorcyclist. Timing cams is rather imposing, until you have done
it once. You will need a degree wheel and some method of finding TDC (we used a
two stroke timing tool). If the cam is not in the right place, you must press
the cam sprocket off and reposition it to change the timing. This isn’t very
difficult but will require a press.
PISTONS & SLEEVES: The Yamaha 650 needs a
piston limited to about 9.5:1 compression ratio and there should be generous
squish area in the combustion chamber. These features lead to high detonation
resistance and lower operating temperatures. Megacycle supplied us with the
piston from which we were to develop our desired final product. they a 10.2:1
piston of 80 mm diameter (753cc) that has the proper shape and is of excellent
quality. However, it did live too far from the head surface to give the
necessary .040-.050-inch clearance for proper squish effect. We found that if
the dome of that piston was raised and the top was machined off, we would have
our piston. Not surprisingly, it turned out to look very much like the pistons
used in the Harley-Davidson XR750 dirttracker.
The sleeves most vendors use are a little thin for
long-term dimensional stability, so we requested-and got- thicker ones. There
are compromises to be made with cylinder sleeves. If they are too thin,
they will warp and the engine will not seal well. It they are too thick, the
rings will not receive the cooling they need for long life. Branch recommends a
sleeve that is between four and five millimeters thick. Megacycle ordered
thicker sleeves from the manufacturer and will furnish them with the pistons.
Piston rings were not a problem and neither were piston pins. Megacycle
has been selling a set of American-made rings that have been installed in many
hundreds of 750s and that work and last. The best pin for the Yamaha is the
stock item, so we used them. There were only two head gaskets available
for the 650/750 conversion: one made in America and the other in Japan. Fore
several reasons we decided that the Japanese had the better product. We
used it, and Megacycle will include it in their conversion kits. The piston kit,
including gaskets, retails for $218.
CYLINDER ASSEMBLY: Next we looked into who could install the
cylinder sleeves and bore the cylinders for our conversion. We didn’t
have to look far to find two sources whose work is beyond reproach: Vance
and Hines Racing and Engine Dynamics, both here in California. VHR did
ours, and with our precision bore gage, we could not see any variation in
roundness nor could we detect any taper. We have seen examples of the work
done by Engine Dynamics, and it too is as near perfect as we have had the
privilege of fondling. Never, never underestimate the importance of the
quality of a bore job or cylinder honing. If the rings don’t seal, you
lose power. If there is not full contact between the rings and cylinder, the
rings will overheat, and you lose power. Taper, at high engine speeds, can cause
the rings to lose contact with the cylinder walls and flutter, and you lose
power. If you cannot fully trust your local machinist to install the sleeves and
do the boring, take the time to send the job to one of these companies. It
will be worth the wait. VHR charges $45 for sleeve installation and $36 for
boring. They hone the aluminum cylinder block before installing the
sleeves to increase the contact area and therefore, heat transfer. To
ensure maximum cylinder cooling and stability, we sent our cylinder to Plasma
Technology (the people who make those lovely metal-sprayed brake discs) to have
the sleeve/cylinder interface filled with a Loctite material. This is done
by immersing the cylinder assembly in a vat of thin liquid and then evacuating
the sealed vat. The Loctite is sucked into the sleeve/cylinder space and
"kicks over." The hardened plastic material transfers heat about 25
times better than air and strengthens the assembly. Plasma Technology will
provide this service for $10 per bore, and we recommend it if you want to go all
out.
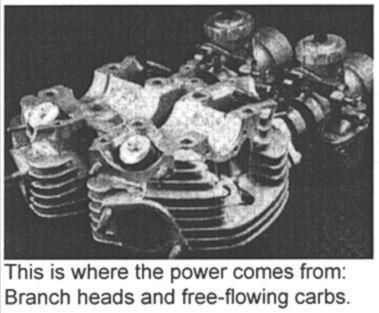
PORTING: Jerry Branch did some of the engine development work
for the Yamaha racing effort when Kenny Roberts was racing here in the early
‘70s. He ported any heads for Yamaha and for nearly everybody else. He assured
us that he could improve the flow (and therefore the power) of the XS head by
almost 25 percent. His work consists of reshaping the valve pockets and ports
and installing his excellent guides. The valves were increased in diameter 3mm
on the intake side and 2mm on the exhaust side. The Branch valves are tough,
shaped according to what he found works on the flow bench, and have
chrome-plated stems for extreme durability. Branch valve guides are made of a
material (aluminum-silicone bronze) developed for radial aircraft engine valve
guides. They are so durable that XR Harley tuners only replace them when the
heads are brought up-to-date (every couple of years or so). Included were the
best valve guide seals around: Perfect Circle’s Teflon seals. They simply
don’t wear out.
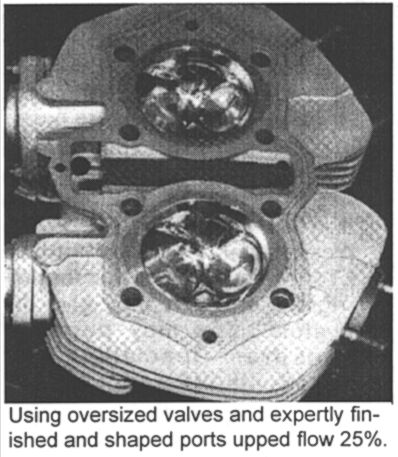 Careful port work is the main reason our engine
developed as much power as it eventually did and is largely responsible for the
incredibly broad powerband of our 750. If the port works well, radical cams are
not necessary. Good ports and moderate-duration, high-lift cams will make the
most power over the broadest rpm range. Nothing you can do will give your bike
as much performance improvement as Branch’s excellent port work. Of course,
you must also do the rest to avoid choking up those beautiful ports. The price
is high for the complete job but it is the most cost-effective modification you
can make. Besides, it won’t wear out. Labor for porting is $225 and the rest
(valves, guides, seals, and springs) bring the total up to $339.50.
Careful port work is the main reason our engine
developed as much power as it eventually did and is largely responsible for the
incredibly broad powerband of our 750. If the port works well, radical cams are
not necessary. Good ports and moderate-duration, high-lift cams will make the
most power over the broadest rpm range. Nothing you can do will give your bike
as much performance improvement as Branch’s excellent port work. Of course,
you must also do the rest to avoid choking up those beautiful ports. The price
is high for the complete job but it is the most cost-effective modification you
can make. Besides, it won’t wear out. Labor for porting is $225 and the rest
(valves, guides, seals, and springs) bring the total up to $339.50.
ENGINE ASSEMBLY: The XS650 is a simple
straight forward motorcycle; it has no complex parts assemblies, nor does it
require special tricks to avoid disaster. The factory shop manual is complete
and confidence-inspiring. Completing the Stage II engine won’t necessitate
purchasing special tools. You may need the services of someone with a hydraulic
press to help with cam timing, but that is all!
Rather than furnish step-by-step directions for
assembly of the 650/750 conversion as we have with our previous update articles,
we will confine our comments to a few pointers on what to do and what not to do.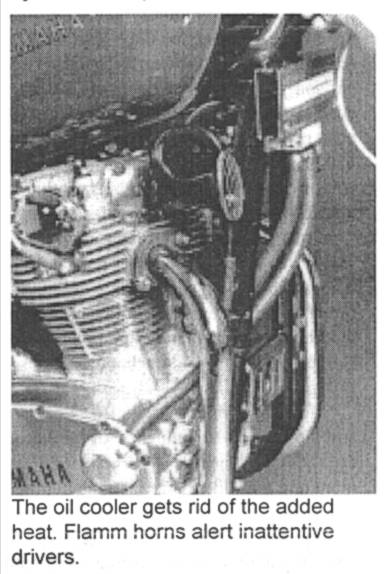
DO: Use a gasket sealant such as Yamabond on
the base gasket; it’ll leak if you don’t. Retorque the head after the bike
has been run for the first time. Install a Lockhart oil cooler. (We used the
temperature-controlled 600 series.) According to Shell Thuet, you should not be
tempted to place the cooler in series with the cam box oil supply line (the
chrome tube running between the cylinders) as it will not be effective with the
small oil flow that results. Before you assemble the piston rings to the
pistons, put each ring in the cylinder bore (you can push it in with the piston
to be sure it is square with the bore) and measure the ring end-gap. It should
be 13-14 thousandths of an inch. If not, file or stone the ring ends until it
is. The oil-scraper rings may have a little more end-gap but the top and second
compression rings should be rather close for best seal life.
DO NOT: Some people recommend drilling out
the restrictor that controls the oil volume to the head. It is located at the
base of the cylinder and the oil feed tube is joined to it. Drilling this is a
mistake; increasing the size of the hole will not help top-end oiling, but it
will reduce the amount of oil getting to the crankshaft and therefore to the
cylinders and pistons. If you are concerned about cam scuffing, use straight 40W
Kendall GT1 oil and Kal Gard "Engine Gard" plus the oil cooler. As
with any engine that really breathes well, our 750 conversion will make power
well beyond the redline. We have been assured that even the short-rod version of
this engine (made after 1974) is safe at 8,000 rpm. Our 750 will make power well
beyond that point; you can no longer shift by "holdin ‘er wide open
‘till the power falls off." Watch the tach. This one of the toughest
engines ever built, but it’s not made of impervium.
Part III Results
Back to Part 1
Back to 650 page